Or: How to make a cardboard badge
So, some time ago, during my usual late-night habit of annoying the crap out of a few friends of mine online, an exchange occurred that gave me the idea of making a police badge for "The Minor Annoyances Unit." A specially trained unit to bring in for all of the most minor and petty complaints that cops get all the time.
Now, if you are unfamiliar with the way I do things in life, let me explain. If I find an idea even the slightest bit funny or entertaining, I jump at it and get right to work. Whether the idea is actually good is debatable, along with if it’ll be entertaining to anyone other than myself.
That should explain why within a few hours of the conversation I had a detailed plan of exactly what I was going to make.
First, using a stock image of a badge from the NYPD, I drew up an idea of how the badge would look.
 |
| All of my best plans are on post-it notes. |
Pretty much just a copy of the stock image, but with an added ring on the inside to specify it as a badge for the Minor Annoyances Unit, as well as putting the badge number on the bottom as I’d seen in other stock images.
Another thing I noted while looking through stock images of badges was that if you’re going to go the whole ‘Law and Order’ route, you need an id to go with the badge.
 |
| Identity hidden to protect the innocent. |
Just your basic id card. Picture of the officer, name, rank, etc. One bit I liked that I saw during my reference search was the idea of having the chief of the department or an otherwise higher ranking person sign the identification in order to authorize the officer on the force. Since I figured I would be the first person to get hit with the abuse of power, I put that bit in with the intention to name myself as the commanding officer.
This would also lend itself to my favorite movie cliché of being able to threaten to take her off the case for letting it get too personal just before she saves the day without the force’s help.
 |
| I'M TAKING YOU OFF THE HEDGE-TRIMMER CASE, IF YOU DON'T LIKE IT, YOU CAN TURN IN YOUR BADGE! |
Because seriously, who doesn’t want to be Frank McRae?
I even tried to come up with a decent logo design for the department which I could put onto the id:
 |
| Latin classes up anything. |
While the final product would come out differently, the important bits are that the department’s initials held the center, and around them would be the Latin phrase “Muto Omnis Pro Nullus Causa,” which translates to “Punish All For No Reason.”
With planning complete, actual building begins.
Step 1: Get some cardboard and cut out the shapes.
 |
| A bunch of scraps. |
I shouldn’t have to explain how to cut things out of cardboard. Get a knife (I use an old stencil scalpel in order to avoid crushing the cardboard from scissor pressure) and cut. I should probably give advice about cutting away from yourself and such to avoid injury, but I stab myself at least once every time I make anything even when following all the safety tips. Didn’t bleed on the project, though!
 |
| It's magic! |
If everything was scaled correctly, the pieces should look good together like this.
Step 2: Base coat.
 |
| Check out that fancy Palatte. |
This step might be optional, as my final product ended up with paint far too willing to chip and fall off, but I wanted to ensure the colors stayed as bright as possible instead of just bleeding into the cardboard. White paint everywhere.
Step 3: Colors.
 |
| That yellow sure looks like gold. Yup. Not like crap at all. |
More painting done. Cover up all the white with the background color you need. The yellow I mixed came out a bit too bright, but in the end it still worked. I didn’t think to take a picture of it, but if your paint is thick enough, you can actually paint the sides of the cardboard, where there are likely a million small holes. Just use a large enough glob of paint and you can spread a layer that will hold together over the holes, making it look solid and smooth. A good trick, even though it is the messiest thing.
Step 4: Details, eye strain, start to panic.
 |
| Everything done freehand, obviously. I can't draw straight lines. Ever. |
For the badge number, I used a smaller brush. Easy.
The center piece, however, called for details so small that no brush available would do. Every line, every letter, even the seal of New York in the center all had to be painted on by dipping the tip of a sharpened pencil into the paint and painting everything dot by dot. If you love monotonous work, or are actually an inkjet printer who somehow thinks you’re a person, you’ll love this bit.
This is also when I discovered that my paint was beginning to chip as it dried. While pencil-painting the center section, the head of the bird on the seal (or vaguely bird-shaped blob, as my painting work suggests) actually lifted off as I pulled the pencil away! If you ever want to hear me use a string of obscenities for ten minutes straight, just have me work on something for hours and show me that it’s begun to fall apart before it’s even finished.
Step 5: ASSEMBLE!
 |
| Almost done. |
Glue those bits together!
I didn’t have glue, to be honest.
I did have adhesive putty.
So, this badge is being held together the same way a lot of posters are being held to college dorm walls. Works surprisingly well.
BONUS STEP: Damage control lamination.
 |
| Done! |
Yep. I covered it in tape.
At least the paint won’t chip and fall off, now.
I also drew some other details on in ink just to make it look a touch better.
After a quick bit of photoshop, the badge and id were finished.
 |
| The image on the id changed, but the basics are still there. |
The id was printed onto blank business card stock. If you don’t have business card stock, then I don’t know what to tell you. Abandon hope and give up forever.
Or just print it to the right size on some sturdy paper and cut it out, you know, whichever.
That’s how it’s done!
So, how were the props received?
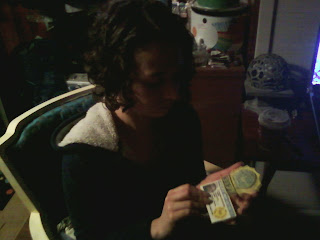 |
| What the hell did you do now, Steve? |
Quite well, actually.
You can now rest easier knowing that the Minor Annoyances Unit is out there stopping people from bringing 11 items to the 10 items or less lane and all other annoyances with their own brand of justice.
Yet somehow I’m allowed to remain the complete annoyance I’ve always been.


